IFrame – embedding map into your own website
If you need to easily and without API knowledge or programming skills place a map window with a map, including shared content (personal data displayed on the map), you can do so through the Mapy.cz “Share – Embed map in your own pages” feature.
What can be shared on the map
Using the so-called iFrame component, you can display all the content that you can share on the map, such as:
- group of POIs
- content of a selected folder in My maps
- planned route
- manual measurements
- custom points
- photo on Fotomapa (Photo Map)
- view from the Panorama service
- search result
Parameters you can set for the shared map
- size of the resulting shared map (small, medium, large, custom)
- display of a preview map of the Czech Republic/world
- display of custom captions for the shared content
Guide to adding a map to your pages
If you want to embed a map in your own pages, follow these steps:
- In the map, choose your preferred map base
- (you can choose any map – e.g., basic, tourist, aerial, winter, etc., including the 3D view)
- Select the content you want to share on your pages – the content can be either manually created or saved in a folder in My maps
- Click the “Share” button in the right panel (either on the detail or above the folder) or select the option “Share this map” in the Tools dropdown menu
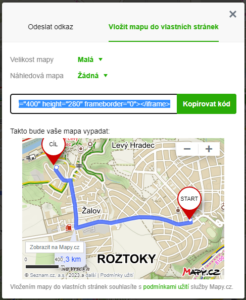
- In the displayed pop-up window, select the tab “Embed map in your own pages,” and if you’re sharing an item/folder saved in My maps, enable its sharing with the toggle switch.
- Choose the size of the resulting window, either from the predefined sizes (small, medium, large) or enter your preferred window size
- You can also enable display of a preview map or display of custom captions
- Check how your map, including the content, will look
- Finally, click the “Copy code” button to copy the generated code and paste it into your web pages
How to enable the display of a preview map in the shared map
If you want to help users understand the location of the place you are sharing in the context of the entire Czech Republic/world, you can enable the display of a preview map in the shared map. To activate the preview map, use the “Preview map” toggle switch in the sharing dialog with the map preview. You can choose either a preview map of the Czech Republic or the world.

After selecting the type of preview map, the map will be regenerated. The preview map will automatically appear in the top left corner, with a blue dot indicating the location of the shared item or corresponding to the center of the shared map.
How to enable the display of custom captions in the shared map
You can add custom text captions to the items shared in your map.
You can enter a custom caption for a specific point or any item you save in “My maps” and manually enter a custom caption either during saving or by modifying the default name later. You can add captions to any saved points of interest, planned routes, custom measurements, and more.
To enable the display of custom captions in the shared map, use the “Captions in the map” toggle switch in the sharing dialog with the map preview. You can choose either “None” or “Custom.”
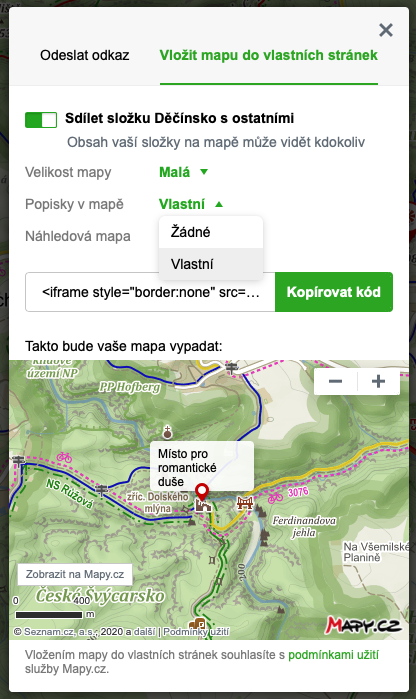
After selecting the “Custom” option, the preview will be regenerated, and the custom captions will automatically appear in the map preview for the shared items where you have manually entered them. Other items will display the original markers with icons and no captions.
Accessing the details of individual shared items
End users consuming the content of your shared map can view the details of shared items by clicking through to the Mapy.cz website. For example, if you share a tip about a trip (such as an interesting castle), clicking on that shared item will display its details on Mapy.cz, including textual description, address, links, and other information. For shared routes, clicking on them will show the details of the planned route, including the itinerary and route profile. The click-through functionality works automatically for all shared items without requiring activation.
Tip: Sharing a GPX Route Recording
If you want to share a recording of a route in GPX format in the map, follow these steps:
- Download the route file in GPX format
- Import the GPX file into the map (Tools -> Import GPX)
- The recording will appear in the map as a manual measurement, CAUTION! Imported manual measurements, i.e., unsaved ones, do not have geometry and cannot be directly shared!
- Save the manual measurement to any folder in “My maps” (requires login)
- Display the folder where you saved the manual measurement in the form of the uploaded route
- Select the item and view the details of the saved route / manual measurement
- Proceed with step 3 as mentioned above (i.e., click the “Share” button)
Examples of iFrame Usage
Below are possible examples of iFrame usage:
- E-commerce websites – location of product pickup points
- Amateur race organizers – race route including the location of refreshment stations and first aid points
- Food bloggers – location of recommended French cuisine restaurants